Walt 发布的文章

1、开发环境

  • 开发工具:Vs2019
  • 运行时:dotnet core 3.1
  • 数据库:mariadb或MySql
  • abp版本:2.0.0

2、项目创建

先按照abp官方CLI,

dotnet tool install -g Volo.Abp.Cli

如果之前安装过,更新可以使用:

dotnet tool update -g Volo.Abp.Cli

使用abp官方CLI工具创建项目,

abp new Acme.BookStore

当前版本abp,还支持创建项目时指定mongodb数据库,命令如下:

abp new Acme.BookStore -d mongodb

image-20200119130612630.png

3、更改数据库配置

等待项目构建完成,使用Vs打开项目,进行Nuget还原。abp CLI构建的项目默认使用了SqlServer数据库。本文将介绍在abp vNext 2.0.0版本下构建的项目,如何切换为使用MySql数据库。请注意版本,因abp vNext前期更新变动较大,所以不同版本之间的修改可能不尽相同。

1、修改数据库连接字符串

Acme.BookStore.Web项目中,打开其中“appsetting.json”文件,修改其中连接字符串为MySql格式,例子如下:

"ConnectionStrings": {
  "Default": "server=localhost;port=3306;database=testdb;User ID=root;Password=123456;"
},
2、管理“Acme.BookStore.EntityFrameworkCore”项目中Nuget程序包,卸载其中的“Volo.Abp.EntityFrameworkCore.SqlServer”包,并浏览安装“Volo.Abp.EntityFrameworkCore.MySQL”程序包。如下图

image-20200119131222738.png

3、将错误提示中的“UseSqlServer”代码替换为“UseMysql"。

有两部分需要修改:

Acme.BookStore.EntityFrameworkCore”项目中的BookStoreEntityFrameworkCoreModule.cs文件中options.UseSQLServer()
修改为:options.UseMySQL()
将依赖项目“typeof(AbpEntityFrameworkCoreSqlServerModule)”修改为“typeof(AbpEntityFrameworkCoreMySQLModule)”。

并删除无效的using引用。

image-20200119131451161.png

Acme.BookStore.EntityFrameworkCore.DbMigrations”项目中的BookStoreMigrationsDbContextFactory.cs文件中

var builder = new DbContextOptionsBuilder<EyinzhangMigrationsDbContext>()
                .UseSqlServer(configuration.GetConnectionString("Default"));

修改为:

var builder = new DbContextOptionsBuilder<EyinzhangMigrationsDbContext>()
                .UseMySql(configuration.GetConnectionString("Default"));

image-20200119131531113.png

注意这两处修改的红色部分的MySql的大小写是不一样的。

4、修改Web项目中错误

删除"Acme.BookStore.EntityFrameworkCore.DbMigrations”项目下的Migrator文件夹,重新生成解决方案。如果,出现如下图错误提示,

严重性 代码 说明 项目 文件 行 禁止显示状态
错误 CS8652 功能“可为 null 的引用类型”当前为预览版且不受支持。要使用预览版功能,请使用“预览”语言版本。 Acme.BookStore.Web F:Acme.BookStoresrcAcme.BookStore.WebobjDebugnetcoreapp3.1RazorPagesIndex.cshtml.g.cs 134 活动的

image-20200119132148185.png

此为使用了预览版功能造成的,可在“Acme.BookStore.Web”项目中,打开Pages文件夹下的Index.chtml文件,将如图所示部分注释掉,后期再根据个人情况修改即可。

image-20200119132812448.png

5、重新生成迁移

至此,Mysql配置的修改基本完成,项目也没有错误提示了,将Acme.BookStore.Web项目设置为启动项目,在程序包管理控制台,将默认项目设置为“Acme.BookStore.EntityFrameworkCore.DbMigrations”,输入add-migration命令重新生成迁移。

PM> add-migration
位于命令管道位置 1 的 cmdlet Add-Migration
请为以下参数提供值:
Name: init
Build started...
Build succeeded.
To undo this action, use Remove-Migration.
PM>

image-20200119133258066.png

如上,可以正常生成迁移文件。但是在执行update-database时,会提示如下错误:

Failed executing DbCommand (3ms) [Parameters=[], CommandType='Text', CommandTimeout='30']
CREATE TABLE IdentityServerApiSecrets (

`Type` varchar(250) CHARACTER SET utf8mb4 NOT NULL,
`Value` longtext CHARACTER SET utf8mb4 NOT NULL,
`ApiResourceId` char(36) NOT NULL,
`Description` varchar(2000) CHARACTER SET utf8mb4 NULL,
`Expiration` datetime(6) NULL,
CONSTRAINT `PK_IdentityServerApiSecrets` PRIMARY KEY (`ApiResourceId`, `Type`, `Value`),
CONSTRAINT `FK_IdentityServerApiSecrets_IdentityServerApiResources_ApiResou~` FOREIGN KEY (`ApiResourceId`) REFERENCES `IdentityServerApiResources` (`Id`) ON DELETE CASCADE

);

.....

BLOB/TEXT column 'Value' used in key specification without a key length

6、修改无法创建表IdentityServerApiSecurity的错误

针对如上问题,可使用下面的步骤解决:

参考:https://github.com/abpframework/abp/issues/2053

MysqlDemo.EntityFrameworkCore项目,“EntityFrameworkCore”文件夹下,添加IdentityServerModelCreatingExtensions类。代码如下:

    public static class IdentityServerModelCreatingExtensions
    {
        public static void ConfigureIdentityServerForMySQL(this ModelBuilder builder)
        {
            // Solve the problem of MySQL migration
            // https://github.com/abpframework/abp/issues/1920
    
            builder.Entity<ApiSecret>(b =>
            {
                // After trying, you can also set it to 400
                b.Property(x => x.Value).HasMaxLength(300);
            });
    
            builder.Entity<ClientPostLogoutRedirectUri>(b =>
            {
                b.Property(x => x.PostLogoutRedirectUri).HasMaxLength(300); // or 400 ?
            });
    
            builder.Entity<ClientRedirectUri>(b =>
            {
                b.Property(x => x.RedirectUri).HasMaxLength(300); // or 400 ?
            });
    
            builder.Entity<ClientSecret>(b =>
            {
                b.Property(x => x.Value).HasMaxLength(300); // or 400 ?
            });
    
        }
    }

BookStoreDbContext类中OnModelCreating方法末尾,添加如下代码,并添加对应using引用:

            builder.ConfigureIdentityServer(options =>
            {
                options.DatabaseProvider = EfCoreDatabaseProvider.MySql;
            });
            builder.ConfigureIdentityServerForMySQL();

image-20200119133832269.png

BookStoreDbContextModelCreatingExtensions文件中ConfigureBookStore方法下添加如下代码:

            builder.ConfigureIdentityServer(options =>
            {
                options.DatabaseProvider = EfCoreDatabaseProvider.MySql;
            });

image-20200119134113258.png

全部修改完成后,删除Migration文件夹,重新执行add-migration生成迁移,并执行update-database命令,同步数据库。成功!

image-20200119142517171.png

问题描述

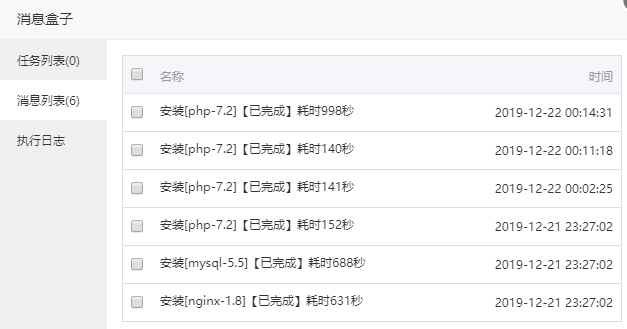
宝塔面板安装php,消息盒子提示安装成功。

提示成功

但是,应用列表中并没有显示。查看日志,可以看到如下信息:

checking for cURL in default path... not found
configure: error: Please reinstall the libcurl distribution -
easy.h should be in <curl-dir>/include/curl/
make: * No targets specified and no makefile found.  Stop.
make: * No rule to make target 'install'.  Stop.

解决方案

ssh登陆服务器,执行如下命令,然后重新安装php即可成功安装。

apt-get install curl
apt-get install libcurl4-gnutls-dev

参考知乎 https://www.zhihu.com/question/325948326/answer/700753639

修正并简化后可分一下几步:

1、将如下内容另存为wt.reg

Windows Registry Editor Version 5.00

[HKEY_CLASSES_ROOT\Directory\Background\shell\wt]
@="Windows Terminal Here"
"Extended"=""
"Icon"="C:\\Users\\Walt\\AppData\\Local\\terminal\\wt_32.ico"

[HKEY_CLASSES_ROOT\Directory\Background\shell\wt\command]
@="C:\\Users\\Walt\\AppData\\Local\\Microsoft\\WindowsApps\\wt.exe"

其中 "Extended"="" 为设置安装Shift右键才显示,如要直接右键即可显示,删除此项即可。
其中Walt为计算机用户名,请自行修改。

2、修改配置

0.5版本之前,如需在当前目录启动,还需要将配置中的startingDirectory项删除。
然而0.5版本之后,删除此项并不起作用,其运行目录仍在用户目录下。想要在当前目录下运行,需设置:

"startingDirectory": null

wpf获取某一属性的绑定信息

背景

WPF开发时,常常会将一些属性进行数据绑定,如某一控件A的宽高属性。然而,有些操作可能会覆盖掉该绑定,如全屏操作,基于一些原因,该操作需要手动修改控件宽高,这时,控件的绑定属性将失效,在取消全屏时,如不做处理,控件A的宽高将无法正常设置。

解决方案

全屏时,在需要手动设置控件A的宽高属性之前,手动保存宽高的绑定信息。

mb_height_multi = BindingOperations.GetMultiBindingExpression((_textbox as TextBox), EmbryologySlide.HeightProperty);

在取消全屏时,重新将宽高属性设置回绑定。

_textbox.SetBinding(TextBox.HeightProperty, mb_height_multi.ParentMultiBinding);

以上是以多条件绑定为例,如是单条件绑定,如下:

mb_height = BindingOperations.GetBindingExpression((_textbox as TextBox), EmbryologySlide.HeightProperty);
。。。
_textbox.SetBinding(TextBox.HeightProperty, mb_height?.ParentBinding);

其他操作

  • 获取Binding/MultiBinding

    MultiBindingExpression mbe = BindingOperations.GetMultiBindingExpression((child as TextBox), TextBox.TextProperty);
  • 拿到其中每个Binding的Path

    Binding bd = mbe.ParentMultiBinding.Bindings[0] as Binding;
    bindingPath = bd.Path.Path;
  • 拿到其中的ValidationRule

    ValidationRule vr = mbe.ParentMultiBinding.ValidationRules[0];
  • 更新MultiBinding

    mbe.UpdateSource();

总结

当然,大部分情况下,只要设计合理,类似全屏之类的操作,是不需要修改类似宽高之类的属性信息的。但一些特殊情况,如对自定义控件全屏,且全屏时,需要将控件移动至新窗体实现。此时若自定义控件高度绑定在了原窗体的数据或控件属性上。就需要用到本文方案了。