标签 abp 下的文章

背景

使用vNext搭建了项目,因项目需要给用户配置头像,但abp Zero模块中的User实体是不包含头像信息的,于是有了这个需求:扩展内置实体。为User表添加头像等信息。

步骤

1、新建MyUser类

该类用来定义新增的字段,不需要继承任何父类,如下所示:

public class MyUser
{
    #region const
    public const int MaxAvatarLength = 366;
    #endregion
        
    /// <summary>
    /// 头像
    /// </summary>
    public string Avatar { get; set; }

}

2、添加MyAppEfCoreEntityExtensionMappings类,

类名可以随意,但是按照惯例,一般以“项目名”+EfCoreEntityExtensionMappings命名。该类主要用来配置为IdentityUser新增字段,代码如下:

public static class MyAppEfCoreEntityExtensionMappings
{
    private static readonly OneTimeRunner OneTimeRunner = new OneTimeRunner();

    public static void Configure()
    {
        MyAppModulePropertyConfigurator.Configure();

        OneTimeRunner.Run(() =>
        {
            ObjectExtensionManager.Instance
                .MapEfCoreProperty<IdentityUser, string>(
                    nameof(User.Avatar),
                    (entityBuilder, propertyBuilder) =>
                    {
                        propertyBuilder.HasMaxLength(User.MaxAvatarLength);
                    }
                );
        });
    }
}

3、配置MyAppEntityFrameworkCoreModule模块中的PreConfigureServices

将上一步配置的内容,在模块中加载,代码如下:

public override void PreConfigureServices(ServiceConfigurationContext context)
{
    MyAppEfCoreEntityExtensionMappings.Configure();
    ...
    base.PreConfigureServices(context);
}

4、配置DbContextFactory类中的CreateDbContext

同上一步,在DbContextFactory中进行同样配置,一些情况下我们需要通过DbContextFactory来获取DbContext,如不配置此项,将会导致获取的DbContext中内容不一致。

public MyAppDbContext CreateDbContext(string[] args)
{
    MyAppEfCoreEntityExtensionMappings.Configure();
    return new MyAppDbContext(builder.Options);
}

5、配置应用层Dto扩展

因头像Avatar信息是我们追加给IdentityUser的,Abp Zero中内置的User相关Dto是没有此项内容的,我们需要对这些Dto做一些添加属性的操作。在Application.Contracts层,新建一个名为MyAppDtoExtensions的类,当然类名称随意。

public static class MyAppDtoExtensions
{
    private static readonly OneTimeRunner OneTimeRunner = new OneTimeRunner();

    public static void Configure()
    {
        OneTimeRunner.Run(() =>
        {
            ObjectExtensionManager.Instance
                .AddOrUpdateProperty<string>(
                    new[]
                    {
                        typeof(IdentityUserDto),
                        typeof(IdentityUserCreateDto),
                        typeof(IdentityUserUpdateDto),
                        typeof(ProfileDto),
                        typeof(UpdateProfileDto)
                    },
                    "Avatar"
                );
        });
    }
}

6、在模块类ApplicationContractsModule中进行配置

为了是上一步配置生效,还需要在MyAppApplicationContractsModule中进行如下配置:

public override void PreConfigureServices(ServiceConfigurationContext context)
{
    MyAppDtoExtensions.Configure();

}

自此,所有操作均已完成,可以重新生成迁移,更新数据库了。这里只演示了在User实体中添加头像,如需在其他内置的实体中添加字段,步骤一样。
1、开发环境

  • 开发工具:Vs2019
  • 运行时:dotnet core 3.1
  • 数据库:mariadb或MySql
  • abp版本:2.0.0

2、项目创建

先按照abp官方CLI,

dotnet tool install -g Volo.Abp.Cli

如果之前安装过,更新可以使用:

dotnet tool update -g Volo.Abp.Cli

使用abp官方CLI工具创建项目,

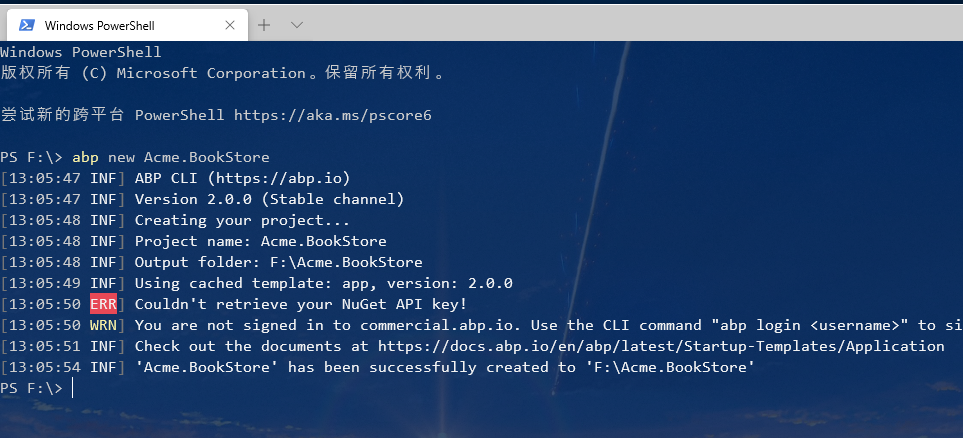
abp new Acme.BookStore

当前版本abp,还支持创建项目时指定mongodb数据库,命令如下:

abp new Acme.BookStore -d mongodb

image-20200119130612630.png

3、更改数据库配置

等待项目构建完成,使用Vs打开项目,进行Nuget还原。abp CLI构建的项目默认使用了SqlServer数据库。本文将介绍在abp vNext 2.0.0版本下构建的项目,如何切换为使用MySql数据库。请注意版本,因abp vNext前期更新变动较大,所以不同版本之间的修改可能不尽相同。

1、修改数据库连接字符串

Acme.BookStore.Web项目中,打开其中“appsetting.json”文件,修改其中连接字符串为MySql格式,例子如下:

"ConnectionStrings": {
  "Default": "server=localhost;port=3306;database=testdb;User ID=root;Password=123456;"
},
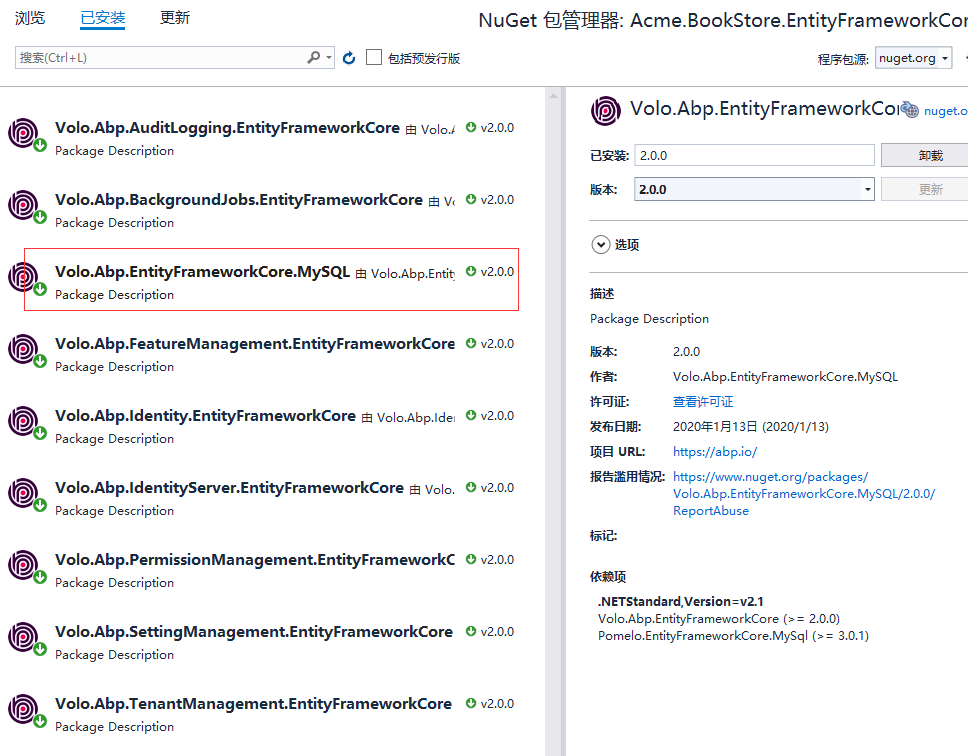
2、管理“Acme.BookStore.EntityFrameworkCore”项目中Nuget程序包,卸载其中的“Volo.Abp.EntityFrameworkCore.SqlServer”包,并浏览安装“Volo.Abp.EntityFrameworkCore.MySQL”程序包。如下图

image-20200119131222738.png

3、将错误提示中的“UseSqlServer”代码替换为“UseMysql"。

有两部分需要修改:

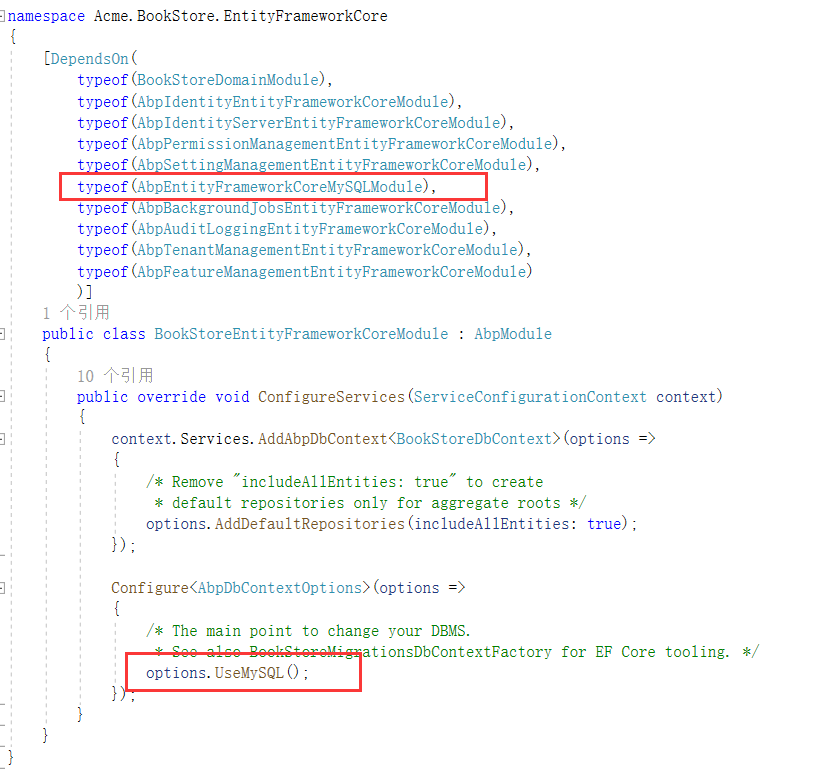
Acme.BookStore.EntityFrameworkCore”项目中的BookStoreEntityFrameworkCoreModule.cs文件中options.UseSQLServer()
修改为:options.UseMySQL()
将依赖项目“typeof(AbpEntityFrameworkCoreSqlServerModule)”修改为“typeof(AbpEntityFrameworkCoreMySQLModule)”。

并删除无效的using引用。

image-20200119131451161.png

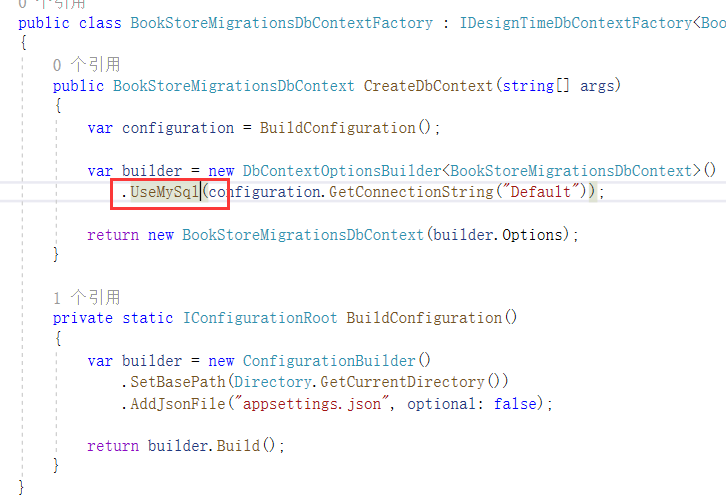
Acme.BookStore.EntityFrameworkCore.DbMigrations”项目中的BookStoreMigrationsDbContextFactory.cs文件中

var builder = new DbContextOptionsBuilder<EyinzhangMigrationsDbContext>()
                .UseSqlServer(configuration.GetConnectionString("Default"));

修改为:

var builder = new DbContextOptionsBuilder<EyinzhangMigrationsDbContext>()
                .UseMySql(configuration.GetConnectionString("Default"));

image-20200119131531113.png

注意这两处修改的红色部分的MySql的大小写是不一样的。

4、修改Web项目中错误

删除"Acme.BookStore.EntityFrameworkCore.DbMigrations”项目下的Migrator文件夹,重新生成解决方案。如果,出现如下图错误提示,

严重性 代码 说明 项目 文件 行 禁止显示状态
错误 CS8652 功能“可为 null 的引用类型”当前为预览版且不受支持。要使用预览版功能,请使用“预览”语言版本。 Acme.BookStore.Web F:Acme.BookStoresrcAcme.BookStore.WebobjDebugnetcoreapp3.1RazorPagesIndex.cshtml.g.cs 134 活动的

image-20200119132148185.png

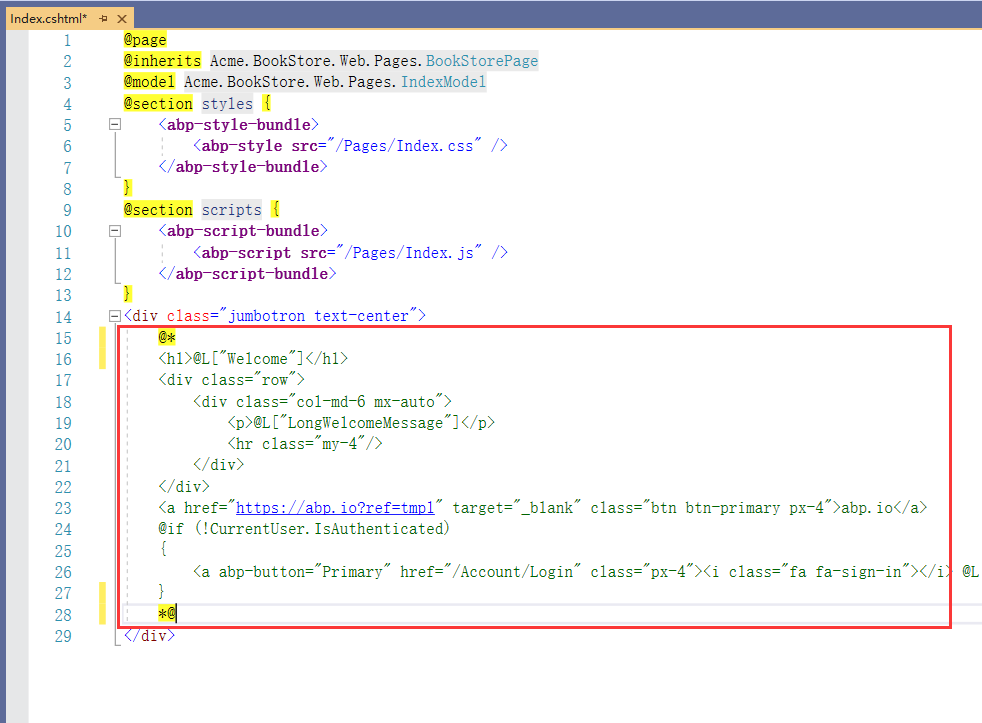
此为使用了预览版功能造成的,可在“Acme.BookStore.Web”项目中,打开Pages文件夹下的Index.chtml文件,将如图所示部分注释掉,后期再根据个人情况修改即可。

image-20200119132812448.png

5、重新生成迁移

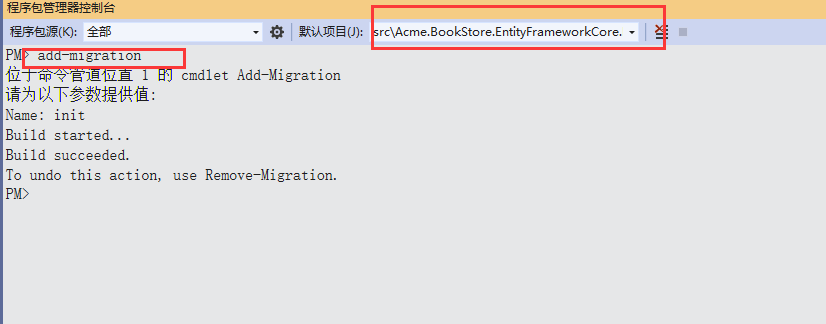
至此,Mysql配置的修改基本完成,项目也没有错误提示了,将Acme.BookStore.Web项目设置为启动项目,在程序包管理控制台,将默认项目设置为“Acme.BookStore.EntityFrameworkCore.DbMigrations”,输入add-migration命令重新生成迁移。

PM> add-migration
位于命令管道位置 1 的 cmdlet Add-Migration
请为以下参数提供值:
Name: init
Build started...
Build succeeded.
To undo this action, use Remove-Migration.
PM>

image-20200119133258066.png

如上,可以正常生成迁移文件。但是在执行update-database时,会提示如下错误:

Failed executing DbCommand (3ms) [Parameters=[], CommandType='Text', CommandTimeout='30']
CREATE TABLE IdentityServerApiSecrets (

`Type` varchar(250) CHARACTER SET utf8mb4 NOT NULL,
`Value` longtext CHARACTER SET utf8mb4 NOT NULL,
`ApiResourceId` char(36) NOT NULL,
`Description` varchar(2000) CHARACTER SET utf8mb4 NULL,
`Expiration` datetime(6) NULL,
CONSTRAINT `PK_IdentityServerApiSecrets` PRIMARY KEY (`ApiResourceId`, `Type`, `Value`),
CONSTRAINT `FK_IdentityServerApiSecrets_IdentityServerApiResources_ApiResou~` FOREIGN KEY (`ApiResourceId`) REFERENCES `IdentityServerApiResources` (`Id`) ON DELETE CASCADE

);

.....

BLOB/TEXT column 'Value' used in key specification without a key length

6、修改无法创建表IdentityServerApiSecurity的错误

针对如上问题,可使用下面的步骤解决:

参考:https://github.com/abpframework/abp/issues/2053

MysqlDemo.EntityFrameworkCore项目,“EntityFrameworkCore”文件夹下,添加IdentityServerModelCreatingExtensions类。代码如下:

    public static class IdentityServerModelCreatingExtensions
    {
        public static void ConfigureIdentityServerForMySQL(this ModelBuilder builder)
        {
            // Solve the problem of MySQL migration
            // https://github.com/abpframework/abp/issues/1920
    
            builder.Entity<ApiSecret>(b =>
            {
                // After trying, you can also set it to 400
                b.Property(x => x.Value).HasMaxLength(300);
            });
    
            builder.Entity<ClientPostLogoutRedirectUri>(b =>
            {
                b.Property(x => x.PostLogoutRedirectUri).HasMaxLength(300); // or 400 ?
            });
    
            builder.Entity<ClientRedirectUri>(b =>
            {
                b.Property(x => x.RedirectUri).HasMaxLength(300); // or 400 ?
            });
    
            builder.Entity<ClientSecret>(b =>
            {
                b.Property(x => x.Value).HasMaxLength(300); // or 400 ?
            });
    
        }
    }

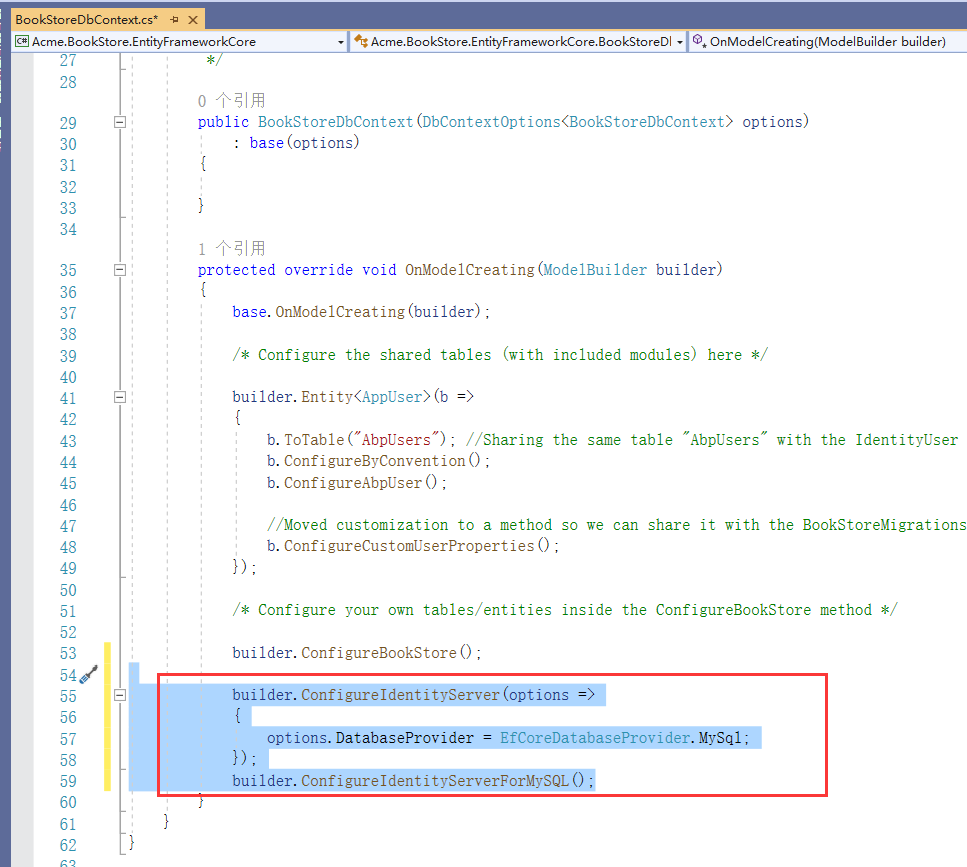
BookStoreDbContext类中OnModelCreating方法末尾,添加如下代码,并添加对应using引用:

            builder.ConfigureIdentityServer(options =>
            {
                options.DatabaseProvider = EfCoreDatabaseProvider.MySql;
            });
            builder.ConfigureIdentityServerForMySQL();

image-20200119133832269.png

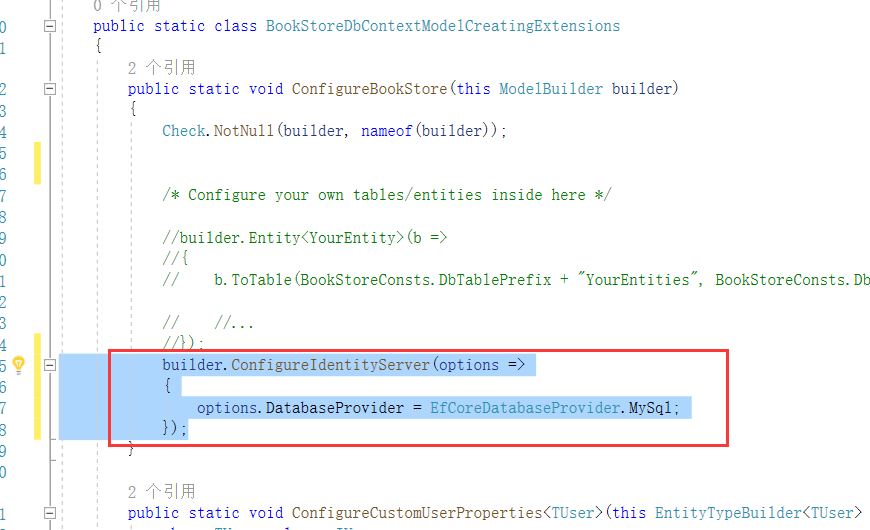
BookStoreDbContextModelCreatingExtensions文件中ConfigureBookStore方法下添加如下代码:

            builder.ConfigureIdentityServer(options =>
            {
                options.DatabaseProvider = EfCoreDatabaseProvider.MySql;
            });

image-20200119134113258.png

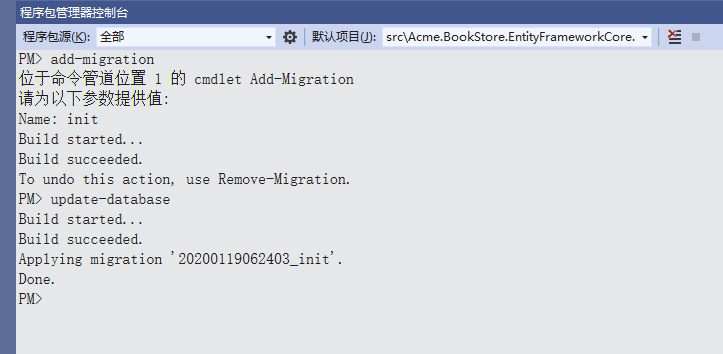
全部修改完成后,删除Migration文件夹,重新执行add-migration生成迁移,并执行update-database命令,同步数据库。成功!

image-20200119142517171.png